Visual Regression Testing with Laravel
I'm not sure how you feel, but I consider myself a backend developer. Sure - I know my way around Vue.JS and really enjoy working with it, but writing CSS has never been my strong point.
At one of our companies recent projects, we are working together with another development team, which is mostly taking care of frontend development. So we build controllers, repositories, services, etc. and hand it over to some basic views. They handle the rest.
We introduced continuous integration to them and showed them our usual workflow, when I thought that it would be excellent to also have some kind of visual CI for frontend changes.
That's what this package is all about.
Keeping a constant visual UI state throughout your application. #
Imagine the following scenario:
You join a new company or maybe start working on an existing project and your task is to change the color of a button on one page.
Well - easy, you go to the _variables.scss file and change the color - BOOM you're done.
But, what if this color is also used on 5 other pages, that are not supposed to change?
Or what if you even checked those 5 pages, but the variable is also used somewhere else in the application?
This is where visual regression testing can help you and your team.
How it works #
Visual regression testing works really simple, by creating a screenshot during your test runs. When a previously created screenshot already exists, those two images get a diff and you see the resulting output.
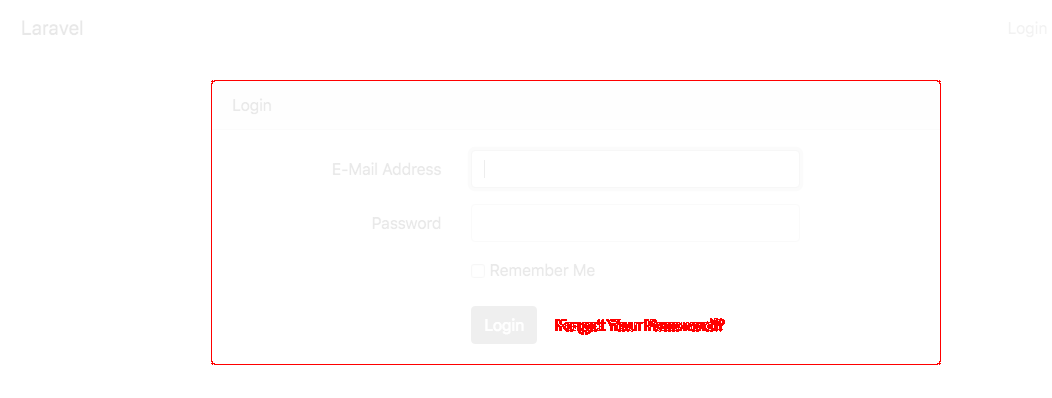
In this example, someone changed the padding of the "Forgot your password?" link as well as the border of the login card.
Integrating it in your Laravel application #
Adding visual regression testing in your Laravel application is really easy. All you need to do is install our laravel-visual-diff package via composer:
composer require beyondcode/laravel-visual-diff
Once that's completed, you need to go into your tests and tell the package to watch for differences on specific pages.
<?php

namespace Tests\Feature;

use Tests\TestCase;
use Illuminate\Foundation\Testing\RefreshDatabase;

class ExampleTest extends TestCase
{
    /**
     * A basic test example.
     *
     * @return void
     */
    public function testBasicTest()
    {
        $response = $this->get('/login');

        $response->assertStatus(200);

        $response->visualDiff();
    }
}
This is an example test that simply visits the /login url, asserts that it receives a 200 OK and then makes a visual diff of the response.
So if you run this test, the package will create a screenshot for you. If you change something on the login page and re-run the test, it will now fail and tell you that the screenshot that you're observing changed and needs to be approved.
This will throw a PHPUnit assertion error, so that it is completely integrated into your testing process.
Responsive testing #
One of the other main benefits of this visual regression testing is the fact, that you are not restricted to only test one resoltion.
The package allows you to configure multiple resolutions in the visualdiff.php configuration file.
/**
 * Define all different resolutions that you want to use when performing
 * the regression tests.
 */
'resolutions' => [
    [
        'width' => 1920,
        'height'=> 1080
    ],
    [
        'width' => 375,
        'height'=> 667
    ]

]
You can simply add multiple resolutions to the array and the visualDiff call will create a screenshot for every resolution that you've defined in here. This makes it really easy to spot UI errors that only occur on smaller resolutions.
If you only want to create a multi-resolution screenshot for one single page / in one single test, you can do this with the visualDiffForResultions method. It accepts an array of resolutions that should be used for this specific test:
<?php

namespace Tests\Feature;

use Tests\TestCase;
use Illuminate\Foundation\Testing\RefreshDatabase;

class ExampleTest extends TestCase
{
    /**
     * A basic test example.
     *
     * @return void
     */
    public function testBasicTest()
    {
        $response = $this->get('/login');

        $response->assertStatus(200);

        $response->visualDiffForResolutions([
        	[
        		'width' => 640,
        		'height' => 480
        	]
        ]);
    }
}
Approving UI changes #
When you run into a scenario where the proposed UI changes are actually correct, you will need to tell this to the visual diff test runner, so that it markes the new screenshot as correct.
You can do this by passing an argument called --update-screenshots to PHPUnit.
./vendor/bin/phpunit -d --update-screenshots
This will just accept whatever visual result the screenshots give you as the new source of truth.
Get started #
I hope this article showed you that visual regression testing can be integrated really easily into your Laravel application.
You can find the source code and the documentation of the VisualDiff package at it's Github repository.