Introducing Expose – an easy to use tunneling service implemented in pure PHP
Introducing Expose – an easy to use tunneling service implemented in pure PHP #
Expose is a PHP package that you can use to share your locally accessible websites with a publicly accessible web-server. Expose comes with a free-to-use server out of the box, but you are free to host your own server and use your own custom domain. Think of it as a completely open-source alternative to services such as ngrok. The package has a extensive documentation and I've spent most of my time over the last weeks working on this.
In this blog post I want to guide you through some technical details, as well as tell you all about Expose and how you can get started.
What is a tunneling service? #
A tunneling service allows you to make your local websites available via a "tunnel" connection. Have you ever wanted to share the current state of your local Laravel package with a colleague? Or maybe you needed to test a webhook but want it to point to your local development environment. That's when you use a tunneling service such as Expose. If set up properly, you can even use this to avoid firewalls when sharing your local websites.
What is Expose? #
Expose is such a tunneling service - written in pure PHP. It comes with a client and server, so you have complete freedom over how you want to share - and host your own website tunnels.
The Expose client has a beautiful local dashboard that is served via a webserver implemented in PHP. On the dashboard you can see all incoming requests and their responses in real-time.
The Expose server takes care of accepting the local shared websites from the client and is highly configurable. You can configure a message of the day that your users see when they connect to your Expose server, you can enforce authentication tokens to only allow authenticated users to connect and share their sites, limit the maximum connection time and much more.
But don't worry - if you would rather not host your own Expose server, we are providing our own server for free!
Both, the server and the client, are powered by ReactPHP - an amazing and battle tested PHP library that allows you to write non-blocking, event-driven PHP code. The package also powers our Laravel WebSockets package and I even recorded a free video course about ReactPHP, in case you want to know more about the nitty gritty details.
Sharing your local websites #
The easiest way to get started with Expose is by installing it as a global Composer dependency:
composer global require beyondcode/expose
Make sure to add your composer binary folder to your PATH environment variable so that the expose command is globally accessible.
If you are using Laravel Valet, or host your local sites using the .test TLD, sharing a site is as easy as this:
cd my-site/

expose
This will automatically connect to our Expose server and share a local website called my-site.test. For sharing the site, it will try and register a subdomain called my-site.sharedwithexpose.com. Of course, if you host the Expose server on your own domain, this would be your domain instead.
If you use a different TLD than .test, or you just do not follow the convention of having the folder-name being the same as your local website name, you can also explicitly share a URL with expose:
expose share my-local-website.local
This is going to share my-local-website.local - but instead of giving you a fixed subdomain, the Expose server will generate a random subdomain name for you.
If you would rather use your own subdomain name, you can define it like this:
expose share my-local-website.local --sudomain=website
Using the sharedwithexpose.com server #
If you are running expose for the very first time, you will need to provide an auth-token in order to connect to our free Expose server.
To get your token, simply create a free Beyond Code account – or login with your existing credentials. That's the account that you already have, if you've watched any of my video courses or if you use our desktop apps.
To register your token with expose, simply call:
expose token [YOUR-TOKEN]
If you would rather host your own Expose server, you do not need to obtain an auth token from us.
How does all of this work? #
There's a lot more to be said about how to get expose up and running, but this process is already covered in the Expose documentation.
So let's take a look at how this works.
Before I started working on this, I sat down with Christian Lück who is in the core-team of ReactPHP. In a Zoom session, we came up with the basic idea of how a sequence diagram of Expose should look like:
So in theory this is relatively simple:
- The Expose client connects to the server and establishes a "control connection" over which the server and client can talk.
- When an incoming HTTP request comes in, the server looks up the matching client control connection and asks it to open a new connection for the incoming request/response data
- The Expose client connects to the server and establishes a "proxy connection"
- The Expose server sends the incoming HTTP request to the client
- The client sends the incoming HTTP request to the local destination URL and sends the response back to the Expose server
- The Expose server takes the response from the client and sends it to the browser
Let's go through these steps in the code.
The control connection #
When you run expose share my-url.test, the Expose client first connects to the configured Expose server. This connection is established via a WebSocket connection. This has the advantage that Firewalls can be avoided, as the traffic is a regular HTTP(S) traffic – and by using WebSockets, we can make sure that the connection stays alive all the time.
Since all traffic from the Expose client to the server is HTTP based, the server needs to have a route available, that accepts incoming WebSocket connections.
protected function addControlConnectionRoute(): WsServer
{
    $wsServer = new WsServer(app(ControlMessageController::class));

    $this->router->addSymfonyRoute('expose-control',
        new Route('/expose/control', [
            '_controller' => $wsServer,
        ], [], [], '', [], [], 'request.headers.get("x-expose-control") matches "/enabled/i"'));

    return $wsServer;
}
The /expose/control is being added to the router with a restriction - it will only accept connections, when the request has a X-Expose-Control header with the value enabled.
This is to prevent route collisions, in case you share a local website that has a /expose/control route itself.
Now the client connects to this endpoint using Pawl: A WebSocket client written in PHP.
connect($wsProtocol."://{$this->configuration->host()}:{$this->configuration->port()}/expose/control?authToken={$authToken}", [], [
    'X-Expose-Control' => 'enabled',
], $this->loop)
    ->then(function (WebSocket $clientConnection) use ($sharedUrl, $subdomain, $deferred, $authToken) {
        $this->connectionRetries = 0;

        $connection = ControlConnection::create($clientConnection);

        $connection->authenticate($sharedUrl, $subdomain);

        // ...
});
Over this WebSocket connection, the server and the client simply exchange JSON data. So when a client authenticated, it sends along the URL that should be shared and an optional subdomain that it wants for this shared URL:
public function authenticate(string $sharedHost, string $subdomain)
{
    $this->socket->send(json_encode([
        'event' => 'authenticate',
        'data' => [
            'host' => $sharedHost,
            'subdomain' => empty($subdomain) ? null : $subdomain,
        ],
    ]));
}
The server then stores the client connection and associates it with a subdomain - if no subdomain was specified during the authentication, it will generate a random subdomain instead.
The server confirms the authentication with an authenticated event:
$connection->send(json_encode([
    'event' => 'authenticated',
    'data' => [
        'message' => config('expose.admin.messages.message_of_the_day'),
        'subdomain' => $connectionInfo->subdomain,
        'client_id' => $connectionInfo->client_id
    ],
]));
The client can then show the user the information that the connection was established and that incoming requests will be visible in the dashboard:
$connection->on('authenticated', function ($data) use ($deferred, $sharedUrl) {
    $httpProtocol = $this->configuration->port() === 443 ? "https" : "http";
    $host = $this->configuration->host();

    if ($httpProtocol !== 'https') {
        $host .= ":{$this->configuration->port()}";
    }

    $this->logger->info($data->message);
    $this->logger->info("Local-URL:\t\t{$sharedUrl}");
    $this->logger->info("Dashboard-URL:\t\thttp://127.0.0.1:".config()->get('expose.dashboard_port'));
    $this->logger->info("Expose-URL:\t\t{$httpProtocol}://{$data->subdomain}.{$host}");
    $this->logger->line('');

    static::$subdomains[] = "{$httpProtocol}://{$data->subdomain}.{$host}";

    $deferred->resolve($data);
});
Alright, we have our control connection established.
Now a HTTP request comes in on our Expose server. In order to accept all incoming HTTP requests, the server sets up a catch-all route. This ensures that every incoming HTTP request will hit the TunnelMessageController class.
protected function addTunnelRoute()
{
    $this->router->addSymfonyRoute('tunnel',
        new Route('/{__catchall__}', [
            '_controller' => app(TunnelMessageController::class),
        ], [
            '__catchall__' => '.*'
        ]));
}
The TunnelMessageController now needs to figure out the subdomain that the incoming HTTP request is trying to access.
If no subdomain is given, the Expose server will return a homepage view that can be customized.
If a subdomain is provided, the server tries to find a control connection for this subdomain. If no control connection is available, the server responds with a 404 page and status code. Otherwise the traffic needs to be sent to the control connection:
public function handle(Request $request, ConnectionInterface $httpConnection)
{
    $subdomain = $this->detectSubdomain($request);

    if (is_null($subdomain)) {
        $httpConnection->send(
            respond_html($this->getView($httpConnection, 'server.homepage'), 200)
        );
        $httpConnection->close();
        return;
    }

    $controlConnection = $this->connectionManager->findControlConnectionForSubdomain($subdomain);

    if (is_null($controlConnection)) {
        $httpConnection->send(
            respond_html($this->getView($httpConnection, 'server.errors.404', ['subdomain' => $subdomain]), 404)
        );
        $httpConnection->close();
        return;
    }

    $this->sendRequestToClient($request, $controlConnection, $httpConnection);
}
Sending the request to the control connection involves a couple of steps. First, we need to prepare the request and slightly modify it, before we can pass it along to the control connection.
But first, let's take a look at the code:
protected function sendRequestToClient(Request $request, ControlConnection $controlConnection, ConnectionInterface $httpConnection)
{
    $request = $this->prepareRequest($request, $controlConnection);

    $requestId = $request->header('X-Expose-Request-ID');

    $httpConnection = $this->connectionManager->storeHttpConnection($httpConnection, $requestId);

    transform($this->passRequestThroughModifiers($request, $httpConnection), function (Request $request) use ($controlConnection, $httpConnection, $requestId) {
        $controlConnection->once('proxy_ready_' . $requestId, function (ConnectionInterface $proxy) use ($request) {
            // Convert the Laravel request into a PSR7 request
            $psr17Factory = new Psr17Factory();
            $psrHttpFactory = new PsrHttpFactory($psr17Factory, $psr17Factory, $psr17Factory, $psr17Factory);
            $request = $psrHttpFactory->createRequest($request);

            $binaryMsg = new Frame(str($request), true, Frame::OP_BINARY);
            $proxy->send($binaryMsg);
        });

        $controlConnection->registerProxy($requestId);
    });
}
As you can see there is a prepareRequest call - and this one is necessary for the local webserver on the computer that wants to share the local website, to give a valid response.
If we would simply forward the incoming HTTP request data as-is, the local web-server on the Expose client computer would not know what to do with this.
We would forward a HTTP request to some-subdomain.sharedwithexpose.com - while our actual URL is at my-site.test.
So instead, we are adding a couple of headers to our request:
protected function prepareRequest(Request $request, ControlConnection $controlConnection): Request
{
    $request::setTrustedProxies([$controlConnection->socket->remoteAddress, '127.0.0.1'], Request::HEADER_X_FORWARDED_ALL);

    $host = $this->configuration->hostname();

    if (!$request->isSecure()) {
        $host .= ":{$this->configuration->port()}";
    }

    $request->headers->set('Host', $controlConnection->host);
    $request->headers->set('X-Forwarded-Proto', $request->isSecure() ? 'https' : 'http');
    $request->headers->set('X-Expose-Request-ID', uniqid());
    $request->headers->set('Upgrade-Insecure-Requests', 1);
    $request->headers->set('X-Exposed-By', config('app.name') . ' ' . config('app.version'));
    $request->headers->set('X-Original-Host', "{$controlConnection->subdomain}.{$host}");

    return $request;
}
We modify the Host header and set it to the host that was actually specified, when the control connection was established. For example my-site.test.
In addition, we set X-Forwarded-Proto headers, in case we are forwarding our traffic over a different protocol than our local website would speak to us, as well as the X-Original-Host header, which contains the original URL that this request is coming from.
Once we have prepared the request data, we set a one-time event listener to the control connection. When the proxy, for the incoming request ID is ready, we will send the incoming HTTP request over to the Expose client via this newly established proxy connection.
And last but not least, we ask the Expose client to connect back to us:
public function registerProxy($requestId)
{
    $this->socket->send(json_encode([
        'event' => 'createProxy',
        'data' => [
            'request_id' => $requestId,
            'client_id' => $this->client_id,
        ],
    ]));
}
The Expose client then establishes a new WebSocket connection and registers a new proxy connection for the request ID. Once this proxy connection is established, the Expose client accepts the incoming HTTP request and will perform the HTTP request against "itself" or its local webserver.
$proxyConnection->on('message', function ($message) use ($proxyConnection, $connectionData) {
    $this->performRequest($proxyConnection, $connectionData->request_id, (string)$message);
});

$proxyConnection->send(json_encode([
    'event' => 'registerProxy',
    'data' => [
        'request_id' => $connectionData->request_id ?? null,
        'client_id' => $clientId,
    ],
]));
So when performing the actual local request, the client first parses the incoming raw HTTP message into a more useful request object.
This object will be passed to the request logger, that takes care of making the request and response data available on the dashboard and in your CLI. The local dashboard itself also uses a built-in WebSocket server to read the incoming requests in real-time.
Once the request is logged, it can be passed to various "modifiers". These modifiers can modify the incoming HTTP request and optionally abort sending the request to the local URL.
An example for this would be the ability to dynamically add basic authentication in front of your shared sites.
public function performRequest(string $requestData, WebSocket $proxyConnection = null, string $requestId = null)
{
    $this->request = $this->parseRequest($requestData);

    $this->logger->logRequest($requestData, $this->request);

    $request = $this->passRequestThroughModifiers(parse_request($requestData), $proxyConnection);

    transform($request, function ($request) use ($proxyConnection) {
        $this->sendRequestToApplication($request, $proxyConnection);
    });
}
Alright, so our Expose client now has performed the request and passed it back via our proxy connection to the Expose server. The incoming HTTP request from the browser is still "pending" and waiting for a response.
So now, the expose server looks up the HTTP connection for the request ID where it received the data over the proxy connection and sends it to the browser:
protected function sendResponseToHttpConnection(string $requestId, $response)
{
    $httpConnection = $this->connectionManager->getHttpConnectionForRequestId($requestId);

    $httpConnection->send($response);
}
Phew - that's one roundtrip. We have successfully tunneled a HTTP connection from the browser to the Expose server, to the connected client and back.
Extendability #
Since Expose is written entirely in PHP, extending it and adding custom functionality to your own client and/or server is a breeze.
A lot of the things that you can customize can be found in the extensive configuration file.
You can publish the configuration file using the publish command:
expose publish
This will write a config file into the following location:
~/.expose/config.php
This is the content of this configuration file:
<?php

return [

    /*
    |--------------------------------------------------------------------------
    | Host
    |--------------------------------------------------------------------------
    |
    | The expose server to connect to. By default, expose is using the free
    | expose.dev server, offered by Beyond Code. You will need a free
    | Beyond Code account in order to authenticate with the server.
    | Feel free to host your own server and change this value.
    |
    */
    'host' => 'sharedwithexpose.com',

    /*
    |--------------------------------------------------------------------------
    | Port
    |--------------------------------------------------------------------------
    |
    | The port that expose will try to connect to. If you want to bypass
    | firewalls and have proper SSL encrypted tunnels, make sure to use
    | port 443 and use a reverse proxy for Expose.
    |
    | The free default server is already running on port 443.
    |
    */
    'port' => 443,

    /*
    |--------------------------------------------------------------------------
    | Auth Token
    |--------------------------------------------------------------------------
    |
    | The global authentication token to use for the expose server that you
    | are connecting to. You can let expose automatically update this value
    | for you by running
    |
    | > expose token YOUR-AUTH-TOKEN
    |
    */
    'auth_token' => '',

    /*
    |--------------------------------------------------------------------------
    | Default TLD
    |--------------------------------------------------------------------------
    |
    | The default TLD to use when sharing your local sites. Expose will try
    | to look up the TLD if you are using Laravel Valet automatically.
    | Otherwise you can specify it here manually.
    |
    */
    'default_tld' => 'test',

    /*
    |--------------------------------------------------------------------------
    | Maximum Logged Requests
    |--------------------------------------------------------------------------
    |
    | The maximum number if requests to keep in memory when inspecting your
    | requests and responses in the local dashboard.
    |
    */
    'max_logged_requests' => 25,

    /*
    |--------------------------------------------------------------------------
    | Maximum Allowed Memory
    |--------------------------------------------------------------------------
    |
    | The maximum memory allocated to the expose process.
    |
    */
    'memory_limit' => '128M',

    /*
    |--------------------------------------------------------------------------
    | Maximum Allowed Memory
    |--------------------------------------------------------------------------
    |
    | Sometimes, some responses don't need to be logged. Some are too big,
    | some can't be read (like compiled assets). This configuration allows you
    | to be as granular as you wish when logging the responses.
    |
    | If you run constantly out of memory, you probably need to set some of these up.
    |
    | Keep in mind, by default, BINARY requests/responses are not logged.
    | You do not need to add video/mp4 for example to this list.
    |
    */
    'skip_body_log' => [
        /**
         | Skip response logging by HTTP response code. Format: 4*, 5*
         */
        'status' => [
            // "4*"
        ],
        /**
         | Skip response logging by HTTP response content type. Ex: "text/css"
         */
        'content_type' => [
            //
        ],
        /**
         | Skip response logging by file extension. Ex: ".js.map", ".min.js", ".min.css"
         */
        'extension' => [
            '.js.map',
            '.css.map',
        ],
        /**
         | Skip response logging if response size is greater than configured value.
         | Valid suffixes are: B, KB, MB, GB.
         | Ex: 500B, 1KB, 2MB, 3GB
         */
        'size' => '1MB',
    ],

    'admin' => [

        /*
        |--------------------------------------------------------------------------
        | Database
        |--------------------------------------------------------------------------
        |
        | The SQLite database that your expose server should use. This datbaase
        | will hold all users that are able to authenticate with your server,
        | if you enable authentication token validation.
        |
        */
        'database' => implode(DIRECTORY_SEPARATOR, [
            $_SERVER['HOME'] ?? __DIR__,
            '.expose',
            'expose.db'
        ]),

        /*
        |--------------------------------------------------------------------------
        | Validate auth tokens
        |--------------------------------------------------------------------------
        |
        | By default, once you start an expose server, anyone is able to connect to
        | it, given that they know the server host. If you want to only allow the
        | connection from users that have valid authentication tokens, set this
        | setting to true. You can also modify this at runtime in the server
        | admin interface.
        |
        */
        'validate_auth_tokens' => false,

        /*
        |--------------------------------------------------------------------------
        | Maximum connection length
        |--------------------------------------------------------------------------
        |
        | If you want to limit the amount of time that a single connection can
        | stay connected to the expose server, you can specify the maximum
        | connection length in minutes here. A maximum length of 0 means that
        | clients can stay connected as long as they want.
        |
        */
        'maximum_connection_length' => 0,

        /*
        |--------------------------------------------------------------------------
        | Subdomain
        |--------------------------------------------------------------------------
        |
        | This is the subdomain that your expose admin dashboard will be available at.
        | The given subdomain will be reserved, so no other tunnel connection can
        | request this subdomain for their own connection.
        |
        */
        'subdomain' => 'expose',

        /*
        |--------------------------------------------------------------------------
        | Subdomain Generator
        |--------------------------------------------------------------------------
        |
        | This is the subdomain generator that will be used, when no specific
        | subdomain was provided. The default implementation simply generates
        | a random string for you. Feel free to change this.
        |
        */
        'subdomain_generator' => \App\Server\SubdomainGenerator\RandomSubdomainGenerator::class,

        /*
        |--------------------------------------------------------------------------
        | Users
        |--------------------------------------------------------------------------
        |
        | The admin dashboard of expose is protected via HTTP basic authentication
        | Here you may add the user/password combinations that you want to
        | accept as valid logins for the dashboard.
        |
        */
        'users' => [
            'username' => 'password'
        ],

        /*
        |--------------------------------------------------------------------------
        | User Repository
        |--------------------------------------------------------------------------
        |
        | This is the user repository, which by default loads and saves all authorized
        | users in a SQLite database. You can implement your own user repository
        | if you want to store your users in a different store (Redis, MySQL, etc.)
        |
        */
        'user_repository' => \App\Server\UserRepository\DatabaseUserRepository::class,

        /*
        |--------------------------------------------------------------------------
        | Messages
        |--------------------------------------------------------------------------
        |
        | The default messages that the expose server will send the clients.
        | These settings can also be changed at runtime in the expose admin
        | interface.
        |
        */
        'messages' => [
            'message_of_the_day' => 'Thank you for using expose.',

            'invalid_auth_token' => 'Authentication failed. Please check your authentication token and try again.',

            'subdomain_taken' => 'The chosen subdomain :subdomain is already taken. Please choose a different subdomain.',
        ]
    ]
];
I'm not going to cover the individual configuration settings in detail here, but I'm sure that there is plenty that you will find useful to adjust it to your needs.
The local dashboard #
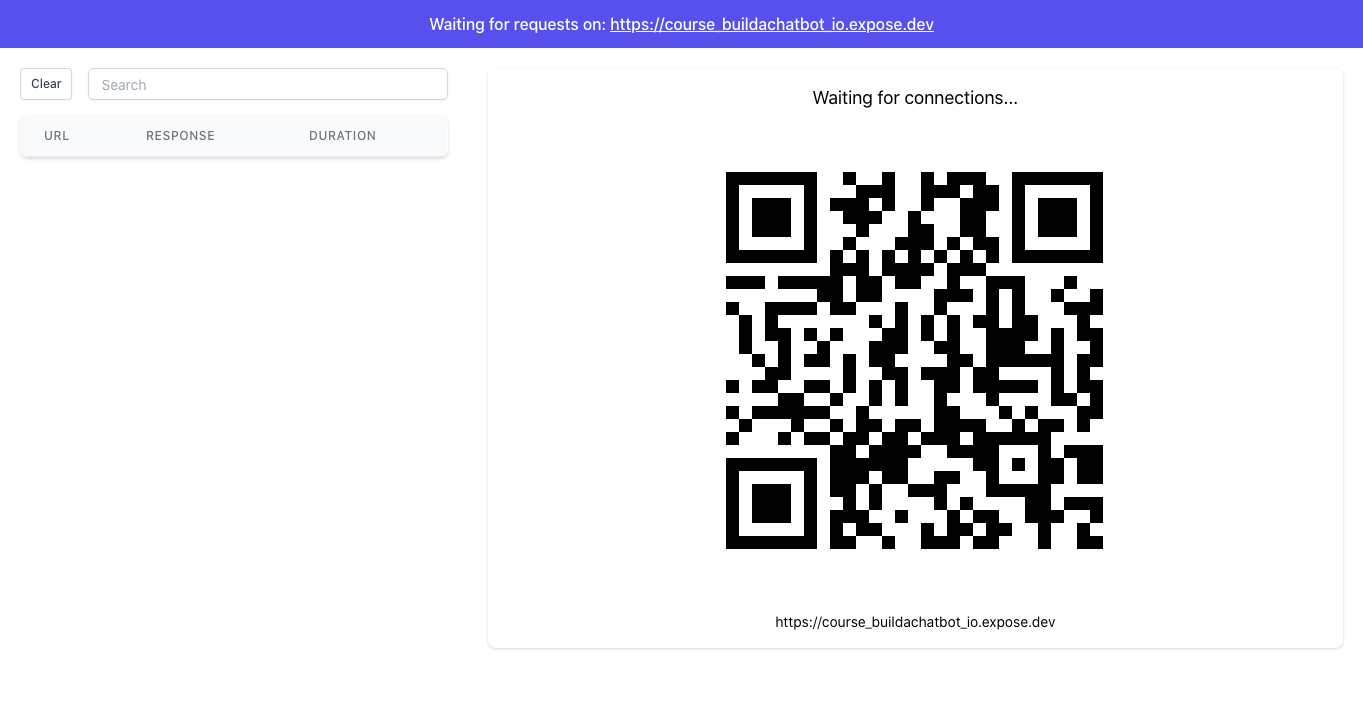
The local dashboard in Expose can be accessed at http://127.0.0.1:4040, once Expose has established a connection to the server. The dashboard also shows you a big QR code that points to your shared tunnel, in case you want to test one of your local sites on your phone or tablet.
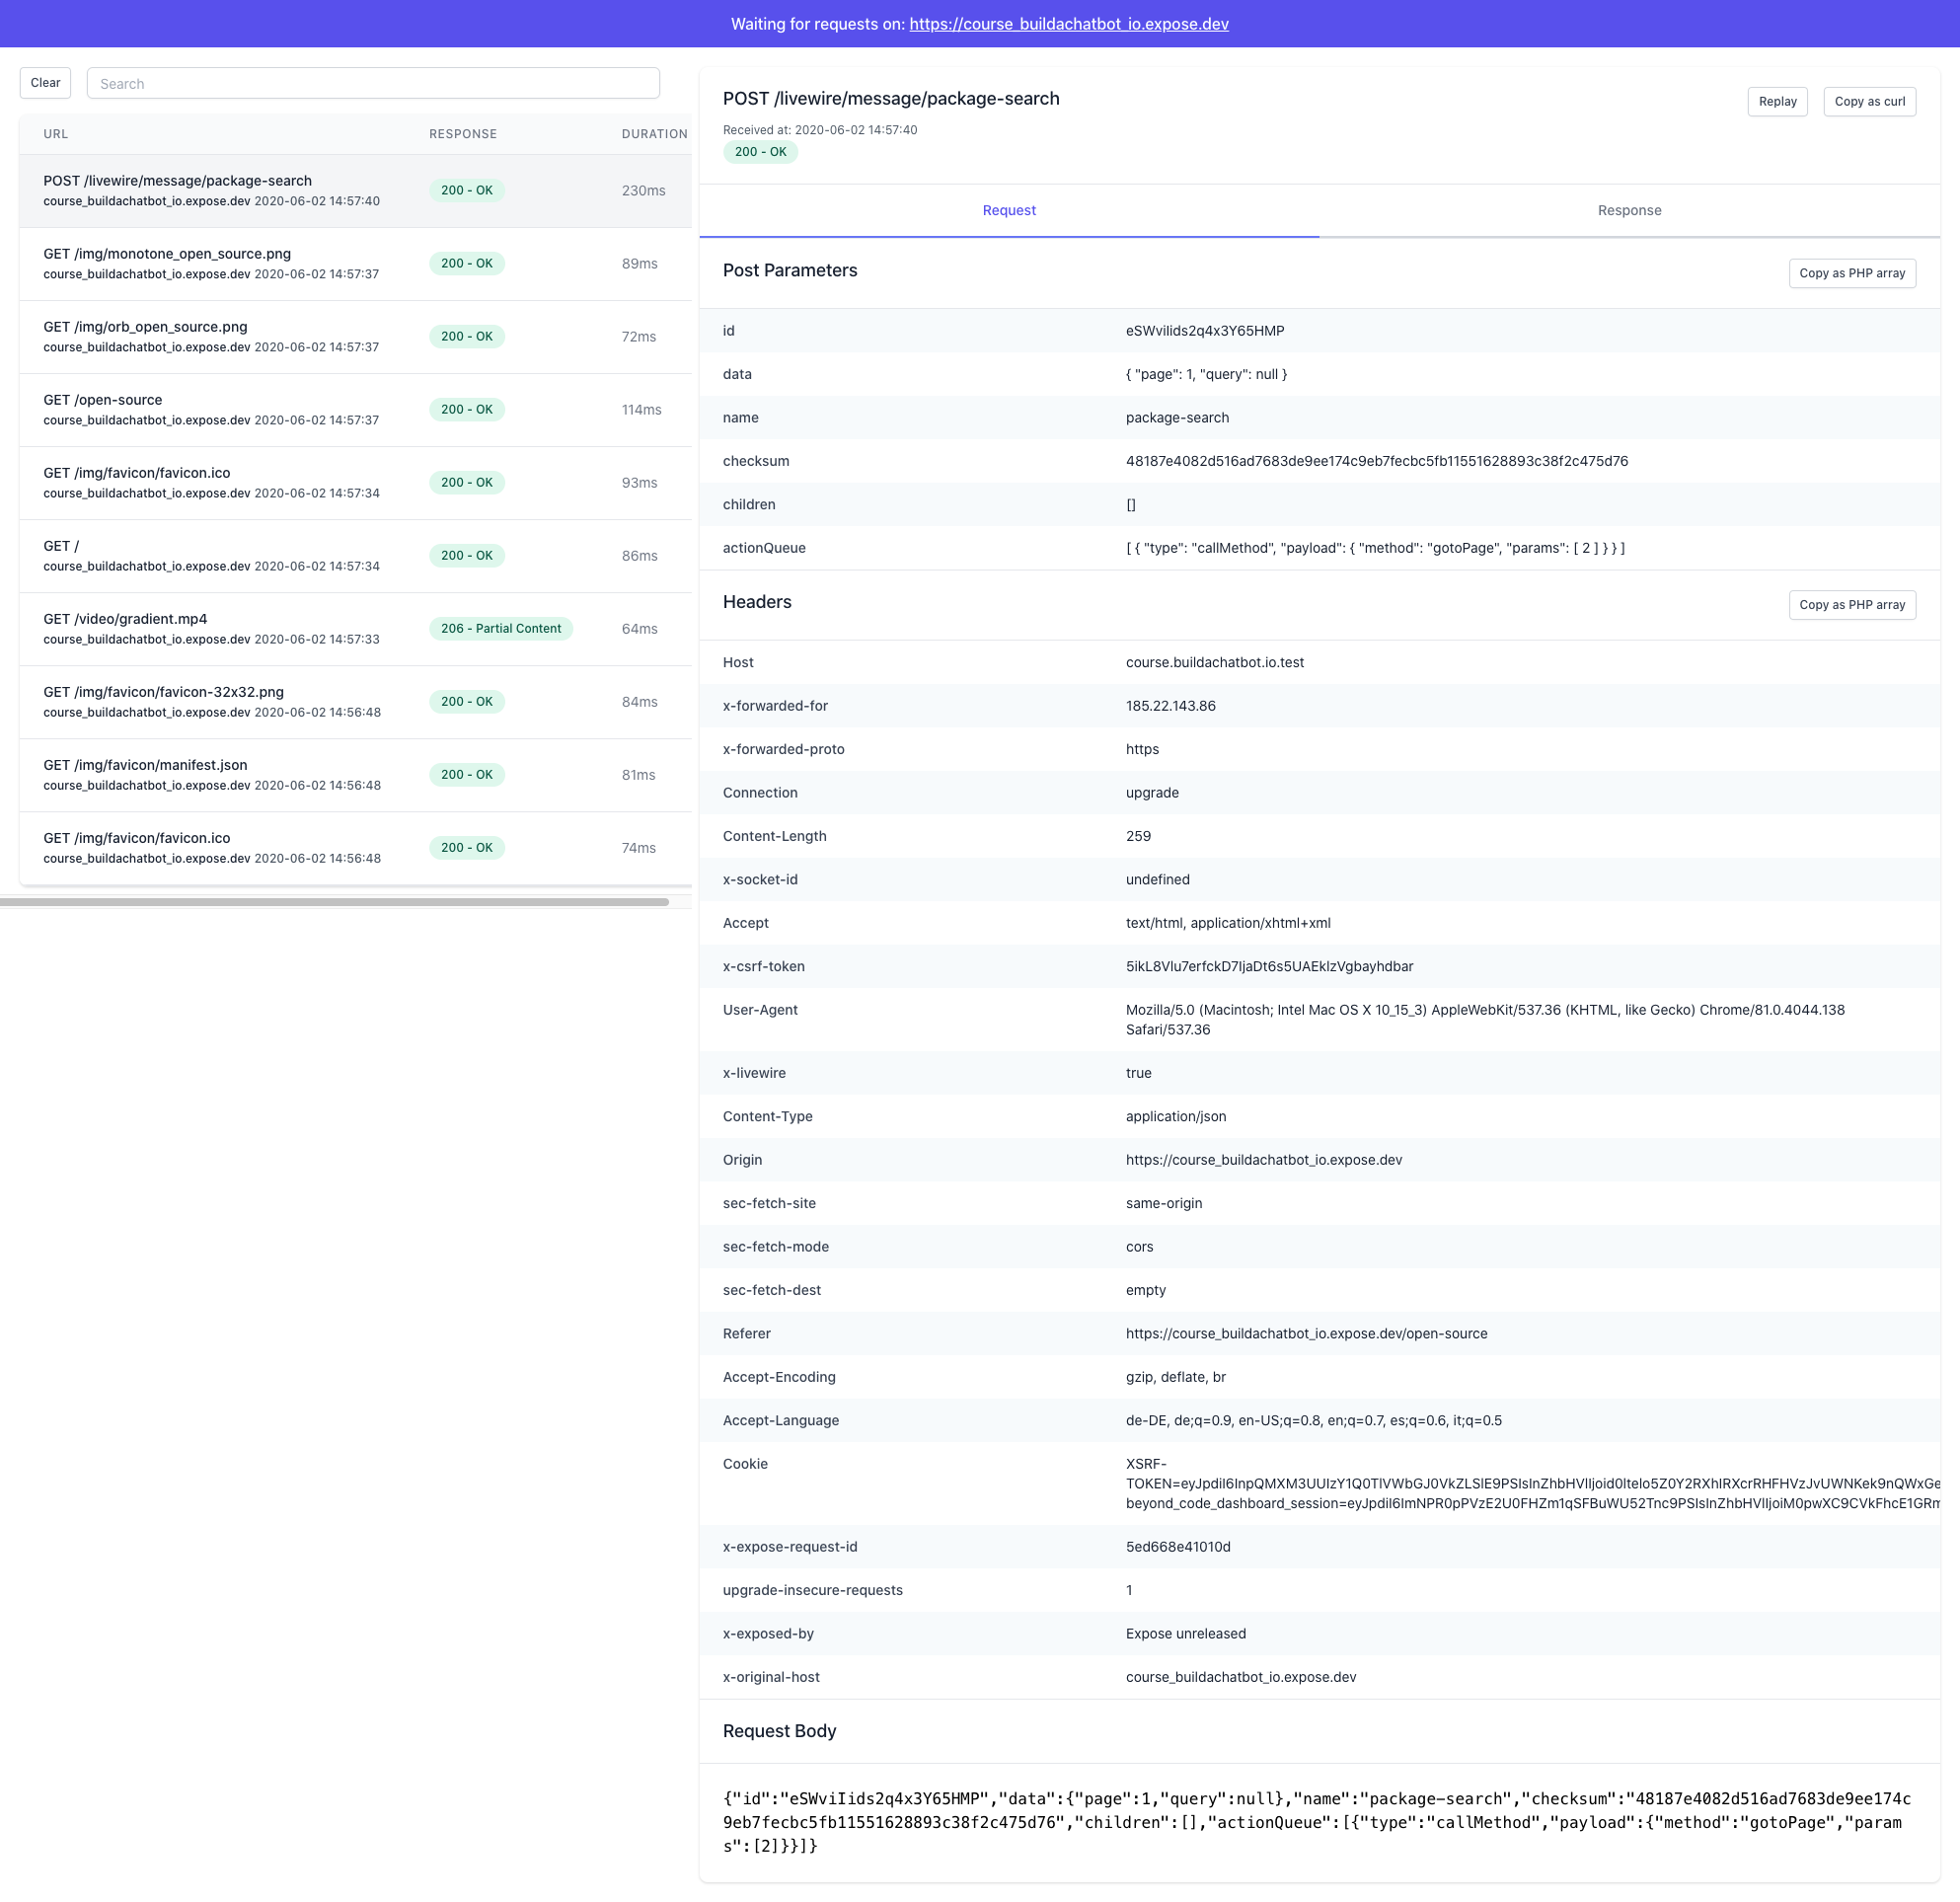
When you click on an individual request, you can see all of the request query parameters, post parameters, headers as well as the response information. What I found extremely handy is the ability to copy query/post parameters as PHP arrays. I've already used this multiple times to get real-world data that I could use when testing my webhook endpoints.
The server UI #
The Expose server comes with a beautiful admin interface, that allows you to inspect all currently connected and shared sites, list and modify users, as well as change a lot of the Expose configuration on the fly.
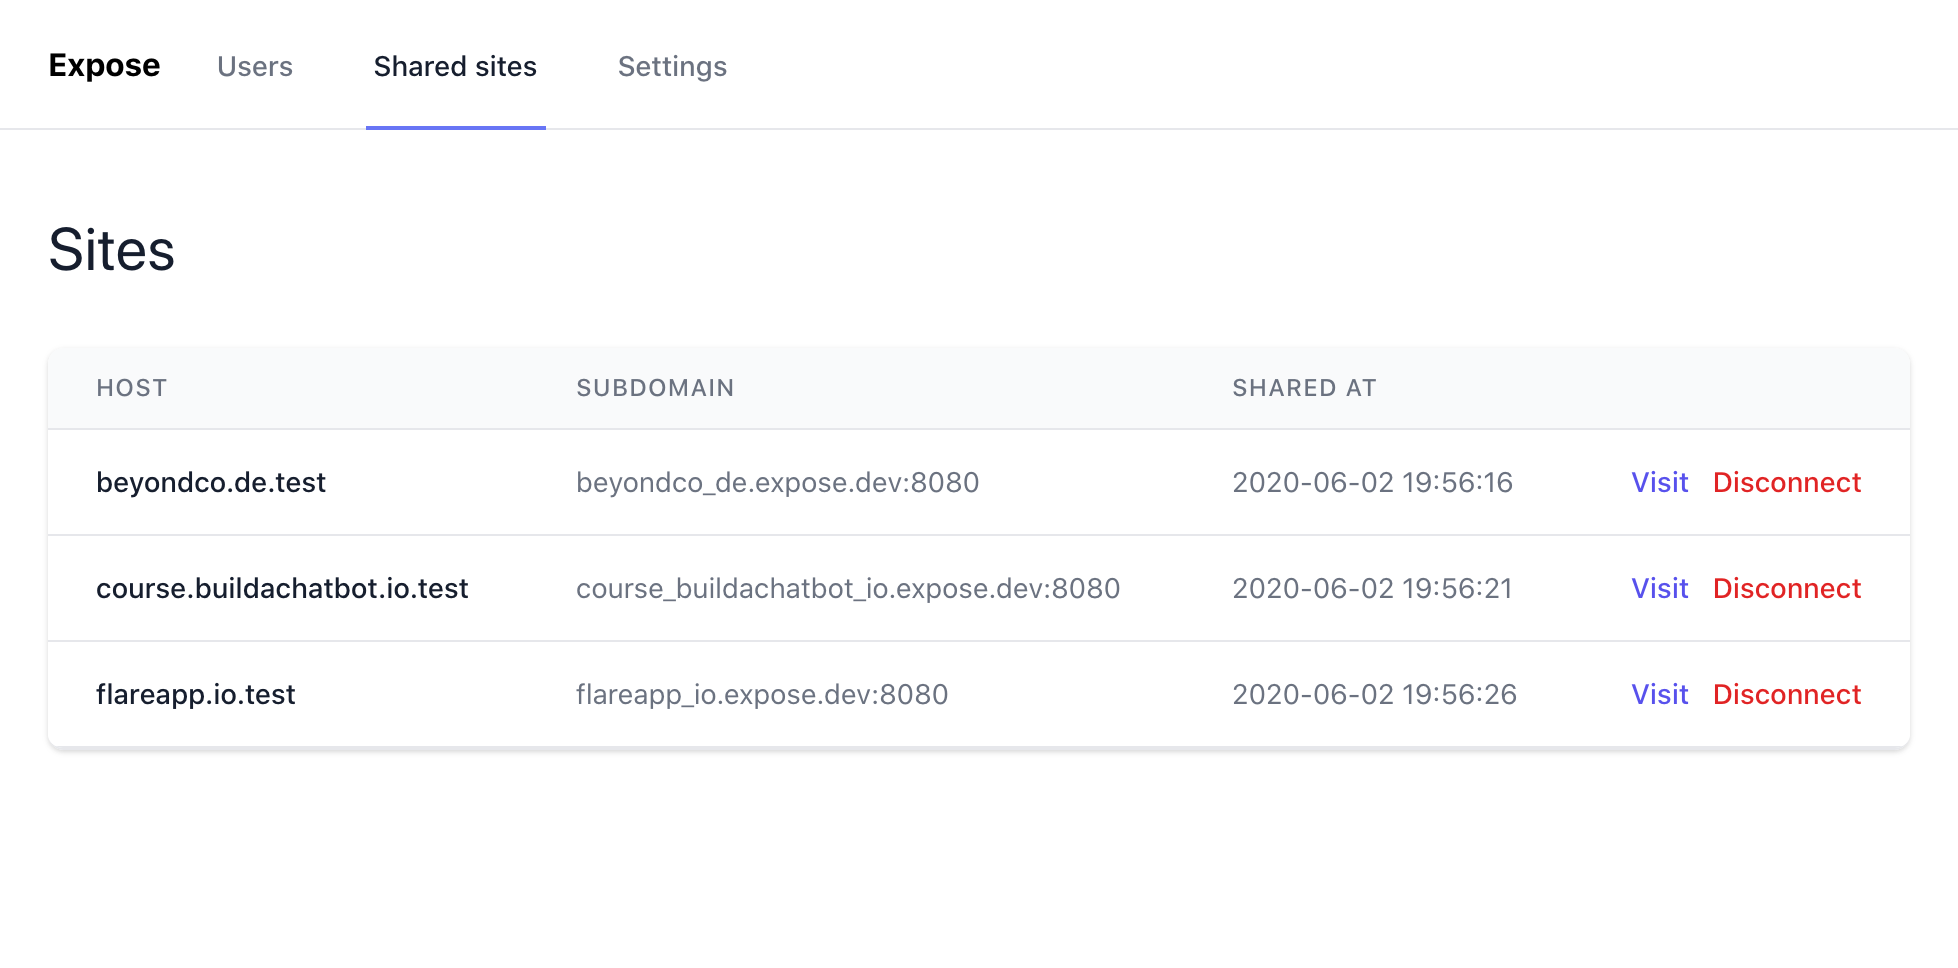
The admin UI itself is always scoped to one specific subdomain on the Expose server. This subdomain can not be claimed by incoming control connections.
Here's the route definition for the admin interface:
protected function addAdminRoutes()
{
    $adminCondition = 'request.headers.get("Host") matches "/^'.config('expose.admin.subdomain').'\\\\./i"';

    $this->router->get('/', RedirectToUsersController::class, $adminCondition);
    $this->router->get('/users', ListUsersController::class, $adminCondition);
    $this->router->get('/settings', ShowSettingsController::class, $adminCondition);
    $this->router->get('/sites', ListSitesController::class, $adminCondition);

    $this->router->get('/api/settings', GetSettingsController::class, $adminCondition);
    $this->router->post('/api/settings', StoreSettingsController::class, $adminCondition);
    $this->router->get('/api/users', GetUsersController::class, $adminCondition);
    $this->router->post('/api/users', StoreUsersController::class, $adminCondition);
    $this->router->delete('/api/users/{id}', DeleteUsersController::class, $adminCondition);
    $this->router->get('/api/sites', GetSitesController::class, $adminCondition);
    $this->router->delete('/api/sites/{id}', DisconnectSiteController::class, $adminCondition);
}
The $adminCondition ensures that thouse routes only match, when the configured admin subdomain is hit.
The admin routes itself are protected by basic authentication. This was the easiest way to add authentication to thouse routes. At first I thought about logging in users in a session, but since the whole web server is written in PHP itself I would've needed to take care of session handling myself too.
abstract class AdminController extends Controller
{
    protected function shouldHandleRequest(Request $request, ConnectionInterface $httpConnection): bool
    {
        try {
            $authorization = Str::after($request->header('Authorization'), 'Basic ');
            $authParts = explode(':', base64_decode($authorization), 2);
            list($user, $password) = $authParts;

            if (! $this->credentialsAreAllowed($user, $password)) {
                throw new \InvalidArgumentException('Invalid Login');
            }
            return true;
        } catch (\Throwable $e) {
            $httpConnection->send(str(new Response(401, [
                'WWW-Authenticate' => 'Basic realm="Expose"'
            ])));
        }
        return false;
    }

    protected function credentialsAreAllowed(string $user, string $password)
    {
        return config('expose.admin.users.'.$user) === $password;
    }
}
When a request for an admin route comes in, the shouldHandleRequest method on the controller gets called. This method then validates the provided username/password combination. If no valid credentials were found (or even provided), the server is going to respond with a WWW-Authenticate header, which tells the browser to ask for credentials.
If all is good, the request will go through and end up serving the admin interface.
Closing notes #
I could not be more excited about Expose. It's a project that I've spent a lot of my spare time on during the last couple of weeks and I am so happy to be able to share it with all of you now. I think it is a great alternative to ngrok - especially since you can self-host and easily customize it.
If you want to know more about Expose be sure to read the extensive documentation. You can take a look at the source code on this GitHub repo.
I also want to thank the beta testers of Expose and especially Cees-Jan Kiewiet and Christian Lück for helping me with ReactPHP issues and edge-cases I ran into. Over the last weeks they have used Expose to develop packages, such as Cashier Paddle and the feedback was extremely valuable for me throughout building Expose.
I hope that you will find Expose as helpful and easy to use as I do.